1. GitHub에 프로젝트 올리기
Repositories를 생성해서 프로젝트를 GitHub에 올린다.
$ git init
$ git add .
$ git commit -m "주석"
$ git remote add origin [생성한 Repositories주소 ]
$ git push -u origin master
2. package.json 추가
homepage(http://[사용자아이디].github.io/[Repositories이름]) 추가하고
scripts부분에 build export를 추가해준다.
{
  "homepage": "http://hhyemi.github.io/hyemi-portfolio",
   ...
},
  "scripts": {
    ...생략
    "build": "next build",
    "export": "next export",
  },
3. css, img 적용 (prefix 설정)
 css 적용
next.config.js파일에 assetPrefix 추가해준다.
module.exports = {
  assetPrefix:
    process.env.NODE_ENV === "production"
      ? "https://boramyy.github.io/invitation"
      : "",
};
img 적용
 config/config.js
prefix를 추가해준다.
export const prefix =
  process.env.NODE_ENV === "production"
    ? "https://hhyemi.github.io/hyemi-portfolio"
    : "";
context/context.js
import React from "react";

const PortfolioContext = React.createContext();

export const PortfolioProvider = PortfolioContext.Provider;
export const PortfolioConsumer = PortfolioContext.Consumer;

export default PortfolioContext;
최상위 컴포넌트
context api를 이용하여 config.js에서 prefix를 가져와서 추가 해준다. ( prefix에서 { 붙여쓰면 사라져서 띄웠어요..)
context api 사용하고 싶지 않으면 컴포넌트에 props로 prefix를 보내면 된다.
...
import { PortfolioProvider } from "../context/context";
import { prefix } from "../config/config";

function App() {
  return (
    <PortfolioProvider value={ { prefix } }>
      <Header />
      <Home />
      <About />
      <Skills />
      <Projects />
      <Career />
      <Footer />
    </PortfolioProvider>
  );
}
export default App;
img 사용 컴포넌트
img의 src부분에 prefix를 붙여서 사용 하면된다. (img는 public폴더에 넣었다.)
import PortfolioContext from '../../context/context';

const About = () => {
  const { prefix } = useContext(PortfolioContext);

  return (
          ...
            <img className="img-resume" alt="..." src={`${prefix}/img/my.jpg`} />
          ...
4. github pages 배포
프로젝트에 gh-pages를 설치해준다.
npm install gh-pages --save-dev
프로젝트 build
npm run build
프로젝트 export
npm run export
next export 명령은 next로 작성한 사이트를 static html앱으로 컴파일한 out/폴더 를 생성해준다.
5. nojekyll 파일생성
touch out/.nojekyll
GitHub 페이지에서 Jekyll 우회, 페이지 저장소의 루트에 .nojekyll이라는 파일을 만들고 GitHub에 푸시하여 GitHub 페이지에서 Jekyll 처리를 완전히 우회 할 수 있다. Jekyll는 이를 특수 리소스로 간주하고 최종 사이트에 복사하지 않기 때문에 사이트에서 밑줄로 시작하는 파일이나 디렉토리를 사용하는 경우에만 필요하다.
6. 프로젝트 배포
$ git add out/
$ git commit -m "deploy to gh-pages"
$ git subtree push --prefix out origin gh-pages
GitHub Repositories / Settings / GitHub Pages 에서 Branch를 gh-pages로 바꾸고 Save해준다.
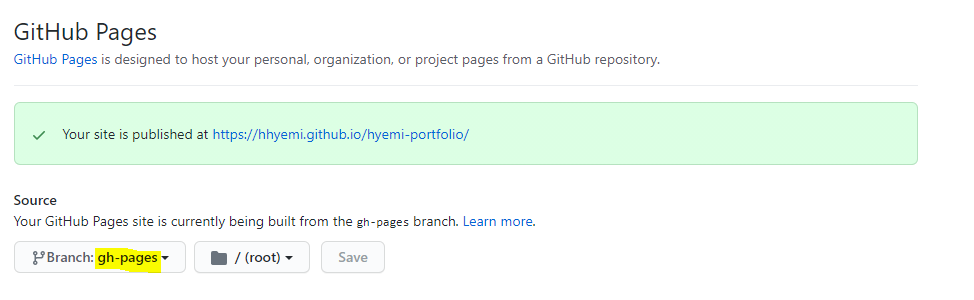 그러고 초록상자안에 있는 사이트로 들어가면 된다.